

Five Layers. One Coherent Setup.
A creator setup is not a collection of individual products – it is a system. Every component feeds into the next, and a weak link in one layer limits the output of the entire stack. The goal of this guide is not to push you toward a specific gear list. It is to give you a framework for making the right decisions in the right order.
The setup stack consists of five layers: Signal Source, Audio, Visual Environment, Processing, and Network & Output. Each layer is covered below – what it does, what it contains, and where beginners should focus first.
A note on the two creator types covered in this guide: Gaming streamers and gaming video creators share the same hardware categories, but weight them differently. Streamers produce live – they need real-time encoding performance and a stable signal at all times. Video creators record locally and edit in post – they prioritize recording quality, storage capacity, and rendering performance. Where the requirements differ, it is marked inline.
Key Takeaways
- Audio before everything else. Bad audio ends a watch session faster than bad video. A dedicated microphone is the single most impactful first investment.
- Build the stack in the recommended order for your format. Get a functional solution at each layer before upgrading any single component.
- Lighting beats camera quality at the same price point. A mid-range camera with good lighting outperforms an expensive camera in a dark room.
- Hardware encoding changes everything on a single PC. Enabling GPU-based encoding in OBS is a free performance upgrade most beginners miss.
- For streamers, network stability is hardware. A flaky Wi-Fi connection kills a stream regardless of what the rest of the setup costs.
- → Layer 1 – Signal source: PC, console & capture card
- → Layer 2 – Audio: microphone, signal chain & acoustics
- → Layer 3 – Visual environment: camera, lighting & background
- → Layer 4 – Processing: CPU, GPU, RAM & storage
- → Layer 5 – Network & output
- → What this guide does not cover
- → The right order makes the difference
Layer 1 – Signal Source: PC, Console & Capture Card
The signal source is where content begins. It is the device that generates the game footage – and the foundation everything else is built on. Getting this layer right means the rest of your setup has something worth capturing.
PC
A gaming PC is the most flexible signal source for content creation. It runs the game, manages streaming or recording software, and handles encoding – all on the same machine. That flexibility has a cost: the PC must be powerful enough to handle all three workloads simultaneously without performance degradation.
For streamers: the PC encodes and transmits video in real time while the game is running. This is the heaviest single-machine workload in content creation. Creators who run into consistent performance issues sometimes move to a dual-PC setup – a dedicated streaming PC handles encoding while the gaming PC runs the game. This solves the bottleneck but adds cost and complexity.
For video creators: the PC records footage locally while the game runs. The recording is encoded in real time as well, but without upload limits, so a higher bitrate and a hardware encoder keep the load manageable. Storage speed and post-production processing power matter most.
Console
A gaming console like PlayStation, Xbox or Nintendo Switch outputs its picture over HDMI. It cannot run OBS or comparable software itself. Some consoles offer built-in streaming, but with limited control over overlays, scenes and audio. For full control, route the HDMI signal through a capture card to a PC.
Capture Card
A capture card sits between the source device and the production PC. It takes the HDMI output from a console, camera or secondary PC and converts it into a signal that recording software can read and process. Without one, OBS and comparable tools cannot capture console footage.
Capture cards come in two forms: internal PCIe cards, which install directly into the PC and can offer lower latency and higher throughput, and external USB devices, which are portable and require no installation. For most beginners, an external USB capture card is a functional and cost-effective starting point. A key specification to check is maximum capture resolution and frame rate – this determines the quality ceiling of the captured signal.
For streamers: a capture card is required to bring a console, a separate PC or an HDMI-only camera into OBS. Single-machine PC streamers using a standard webcam do not need one.
For video creators: a capture card is required for cameras that only offer HDMI output. Cameras with a documented USB webcam mode often work without one, with limits in resolution and control.
Summarized:
PC creators on a single machine can skip the capture card initially. Consoles can stream without a card, but overlays, scenes and a camera need OBS or a similar software on a PC. Manabrand recommends a card for console channels with their own look. An entry-level external USB card with 1080p60 capture is enough to start.
Layer 2 – Audio: Microphone, Signal Chain & Acoustics
Audio is the layer with the highest impact and the most forgiving entry cost. Viewers tolerate imperfect visuals. They do not tolerate bad audio. A noisy, muffled, or echoey microphone signal is one of the fastest ways to lose an audience. This is where every creator should invest first, before camera, before lighting, before any visual upgrade.
Microphone Types
- USB microphone: connects directly to the PC via USB. No additional hardware required. Contains a built-in analog-to-digital converter. A good USB microphone delivers clean, broadcast-quality audio out of the box and is the right starting point for most creators.
- XLR microphone: outputs an analog signal that requires a separate audio interface to convert to digital. Generally offers better quality and more signal control at the higher end – but the real cost is microphone plus interface. XLR makes sense as a deliberate upgrade once the basics are in place.
- Gaming headset: combines audio output and a microphone in one unit. Practical for in-game communication, but not a substitute for a dedicated microphone. Headset capsules are optimized for voice chat, not broadcast audio. An acceptable temporary starting point – replacing it with a USB microphone is the first meaningful audio upgrade to make.
The Audio Signal Chain
The signal chain describes the path audio travels from source to output. Every step in that chain can either preserve or degrade the signal. Understanding it prevents the most common configuration mistakes.
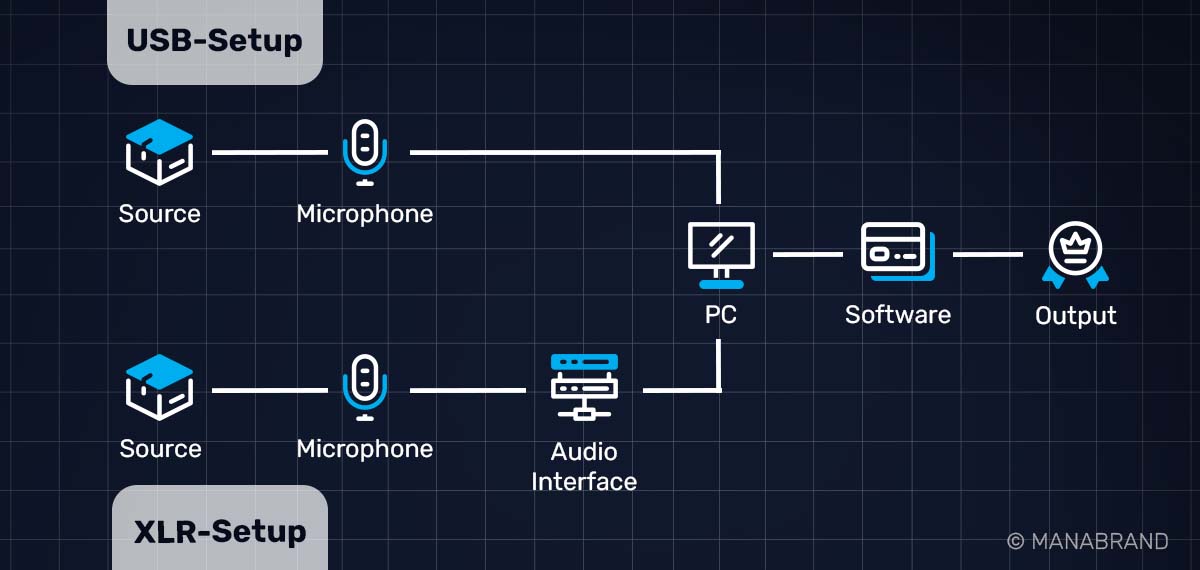
In a USB setup, the microphone captures the voice and sends a digital signal directly to the PC. A built-in analog-to-digital converter handles this step, so no extra hardware is required. The PC passes the signal to the recording or streaming software, such as OBS Studio. The software sets levels, applies filters, and mixes the voice with game audio. The result leaves the chain as a live stream or a recorded file.
An XLR setup adds one device: the audio interface. The XLR microphone outputs an analog signal, so the interface converts it to digital before it reaches the PC. It also provides preamp gain and, for condenser microphones, phantom power. From the PC onward, the chain matches the USB setup. The extra stage gives more control over the signal. It also adds a second place where gain, drivers, or cables can fail.
Monitoring
Monitoring means hearing your own audio output in real time – through headphones connected to the PC or audio interface. For streamers, this is particularly important: you need to hear your microphone, your game audio, and your stream output to catch problems as they happen. Closed-back headphones are preferred because they isolate external sound and prevent audio bleed back into the microphone.
Acoustic Treatment
The room itself is part of the signal chain. Hard surfaces – bare walls, desks, windows, tile floors – reflect sound back toward the microphone as room echo. That reflected sound degrades recording quality regardless of how good the microphone is.
Treating the surfaces directly behind and to the sides of the microphone makes a measurable difference. Practical options include acoustic foam panels, thick curtains or drapes, full bookshelves, and soft furnishings. Full room treatment is not required. A treated corner with a decent USB microphone outperforms an untreated room with an expensive XLR setup.
Summarized:
A dedicated USB microphone plus basic acoustic treatment – even a foam panel behind the mic – is the highest-impact first investment in any creator setup. Sort this before spending on anything visual.
Layer 3 – Visual Environment: Camera, Lighting & Background
The visual environment is everything the viewer sees beyond the game. Camera, lighting, and background work as a unit. Improving one without addressing the others produces uneven results. A good camera in poor light still captures a poor image.
Camera
- Webcam: connects via USB, requires no additional hardware, integrates immediately with streaming and recording software. Current mid-range webcams deliver more than adequate image quality for beginner and intermediate setups. The right starting point for face cam content.
- Mirrorless or DSLR camera: often delivers significantly better image quality than a webcam. It offers shallower depth of field, stronger low-light performance and greater exposure and color control. Two connection options exist. HDMI with a capture card needs a camera with clean HDMI output, a compatible card and continuous power, and offers more control. USB webcam mode works without a capture card on some models, with limits in resolution and control. Either option only justifies the cost if the lighting is already managed.
- Action camera: wide-angle view, used in specific content formats – overhead shots, physical setups, location recording. Not a standard primary camera, but covers defined use cases.
Lighting
Lighting has more impact on the final image than the camera itself at comparable budget levels. A mid-range webcam with good lighting produces a better-looking picture than an expensive mirrorless camera in a dim room. If you already have a working camera, lighting is almost always the more valuable next upgrade.
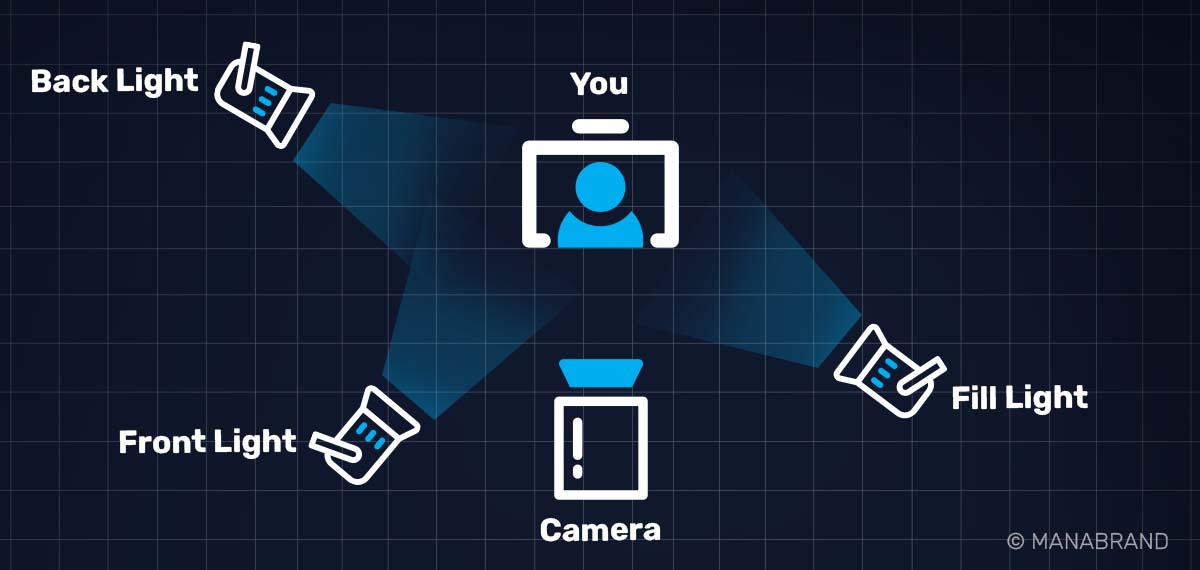
- Key light: the primary light source, positioned in front of and slightly to the side of the face. Produces even, consistent illumination that does not shift with room conditions. Purpose-built LED panels, ring lights, and adjustable desk-mounted LEDs all serve this role. Start here.
- Fill light: placed on the opposite side of the key at lower intensity. Its job is to soften the shadow the key creates on one side of the face – not eliminate it, but reduce it. Gives the image a more balanced, professional look without additional complexity.
- Backlight: positioned behind or above the subject, pointing toward the camera. Creates a subtle edge of light that separates the creator from the background. The detail that makes a setup look intentional rather than assembled. Add this once the key and fill are working.
Summarized:
Key light first, fill light second, backlight third. Each step improves the image. None require expensive hardware – consistent, controllable light matters more than brand.
Background & Green Screen
The background is part of the frame. An unmanaged background – cables, clutter, random shelving – competes with the content for the viewer's attention. A clean, consistent physical environment is always preferable to a virtual background if the space allows it.
Green screens allow full background replacement in software and are a practical solution when the physical space cannot be controlled. They introduce one requirement that is often underestimated: the green screen surface must be lit evenly and separately from the subject. An unlit or poorly lit green screen produces color spill and rough edges that are harder to key than a plain real background. If you use a green screen, the lighting to run it properly is part of the setup cost.
Layer 4 – Processing: CPU, GPU, RAM & Storage
Processing is the layer that keeps everything else running. It determines whether your setup can handle the combined load of gaming, capturing, and encoding – and whether it can do so stably over an extended session. For PC creators, this is the foundation the entire workflow runs on.
CPU
The CPU manages general processing tasks: running the operating system, executing software, and – in many configurations – encoding video. Gaming and encoding compete for the same CPU resources. A processor running a demanding game at high load while simultaneously encoding a video or stream has less headroom for both tasks, and the result shows up as dropped frames, stutters, or audio sync issues.
For streamers: software encoding (x264 in OBS) is CPU-heavy. A processor without enough headroom to separate gaming from encoding is a fundamental bottleneck. Core count and single-core clock speed both matter.
For video creators: recording is encoded in real time as well, but a hardware encoder keeps the CPU load low. The main constraint appears in post-production – export and render times scale directly with processor performance.
GPU
The GPU renders the game. It also enables hardware encoding – encoding video using dedicated hardware on the graphics card rather than the CPU (NVENC on NVIDIA, AMF on AMD). Hardware encoding produces strong quality at a fraction of the CPU cost. Enabling it in OBS is one of the highest-value configuration changes available to any single-PC creator and it costs nothing.
For streamers: switching from CPU to GPU encoding in OBS immediately reduces CPU load and frees processing headroom for the game. This is often the fix for stream performance problems before any hardware upgrade is needed.
For video creators: GPU acceleration speeds up rendering and export in editing software. The benefit is application-dependent – verify that the editing tool in use supports GPU-accelerated export before treating GPU performance as a post-production priority.
RAM
RAM determines how many processes can run in parallel without the system falling back to slower storage. 16 GB is the practical floor for a gaming and content production workload. 32 GB provides meaningful headroom for heavier editing projects, larger asset libraries, or running more demanding software stacks in parallel.
Storage
For streamers: storage requirements are modest unless local VOD recording is enabled. The primary demand is the operating system, streaming software, and game library.
For video creators: local recording generates large files quickly, and at higher resolutions or frame rates the footprint grows fast. A fast SSD as the recording destination is highly recommended – writing footage to a slow drive causes dropped frames during capture. Secondary high-capacity storage handles raw footage archives and project backups. Creators consistently underestimate how quickly storage fills. Plan for it early.
Where to start:
Before buying any new hardware, open OBS and switch the encoder from software (x264) to hardware (NVENC or AMF). This single settings change resolves most single-PC encoding bottlenecks at zero cost. If building or upgrading: CPU and GPU as a matched pair, 16 GB RAM minimum, and a fast dedicated SSD for recording if you produce video content.
Layer 5 – Network & Output
Network
For video creators, network performance has no effect on production quality (as long as the game runs smoothly) – footage is recorded locally and uploaded after the fact. For streamers, the network is active hardware.
Upload bandwidth is the relevant metric, not download speed. Streaming at standard quality requires a consistent upload speed with headroom above the stream bitrate. A connection that technically supports the required bandwidth but fluctuates under load will produce dropped frames or disconnects.
LAN vs. Wi-Fi: a wired Ethernet connection is the correct choice for streaming. Wi-Fi introduces latency variance and is susceptible to interference from other devices, walls, and distance from the router. If running a cable is not immediately possible, a powerline adapter is often a more reliable intermediate step than continuing on Wi-Fi.
Connection stability matters as much as raw speed. A slower but consistent connection produces a better stream than a fast but intermittent one.
Output & Software Bridge
Output is where hardware signals become content. All inputs – game capture, microphone, camera feed – come together in production software, get encoded, and are either transmitted live or written to a local file. The standard tool for gaming creators is OBS Studio, which handles both streaming and local recording, manages multiple input sources, and controls encoding parameters. The quality of what OBS outputs is a direct function of the processing headroom in Layer 4 and the signal quality from the layers above it.
For streamers: OBS encodes and transmits to the platform in real time. Bitrate, resolution, frame rate, and encoder type must match both the platform's ingest limits and the available upload bandwidth. Most stream performance issues trace back to mismatched encoding settings or insufficient processing headroom – not to OBS itself.
For video creators: OBS or a dedicated recorder captures footage locally. That footage then moves into a non-linear editor (NLE) – DaVinci Resolve, Premiere Pro, Final Cut Pro – for editing, color correction, and export. The NLE is where the processing requirements from Layer 4 become the active constraint.
A dedicated software guide covering OBS configuration, encoding settings, and NLE workflows is in development. The hardware covered in this guide sets the ceiling for what that software can do.
What This Guide Does Not Cover
Peripherals (keyboard, mouse, and controller) are intentionally excluded. These are gaming inputs, not content production hardware. Mostly they don't have an effect on what the viewer sees or hears. Peripheral selection belongs in a different conversation.
The Right Order Makes the Difference
Most setup problems are not hardware problems – they are sequencing problems. A creator who spends heavily on a camera before sorting audio, or invests in a capture card before the PC can handle encoding, has not built a better setup. They have built a more expensive one with the same weak points.
Recommended Starting Sequence by Format
For streamers: Audio → Network stability → Signal Source → Processing → Visual Environment.
For video creators: Audio → Signal Source → Processing → Visual Environment → Network & Output.
Use this as a diagnostic framework, not a fixed purchase plan. Find the weakest link in your current stack and fix that first.
Supporting guides covering specific hardware categories – microphones, cameras, capture cards, lighting, and processing hardware – go into product selection and configuration at the detail level. They are linked below as they go live.
Keep Building
Next: The Content Creation Workflow Guide. Hardware gets the setup running. A production workflow keeps it consistent. Learn more about workflow optimization.

Lukas Adams
Media Designer, Online Marketing Manager | Founder of Manabrand
Lukas Adams is a certified Media Designer and Online Marketing Manager with over six years of experience in digital media and marketing. He specializes in digital brand architecture, web design, and content marketing. He founded Manabrand to provide digital creators with repeatable infrastructure blueprints instead of generic motivational advice. His objective is to reverse-engineer industry success into actionable, long-term operational systems.
Related Articles
How to Find Your Gaming Creator Niche
Most gaming creators fail for the same reason: they never define what they actually make. Talent and consistency are not enough without a clear content direction. This guide breaks down how to find a gaming niche with real demand, low saturation, and a defensible position, built through market analysis, language-market gaps, and content-type matching.
How to Start Creating Gaming Content: Your First Steps
Most beginners buy equipment before deciding what to create or where to publish it. This guide covers the four decisions that come first: content type, platform, niche timing, and channel setup.